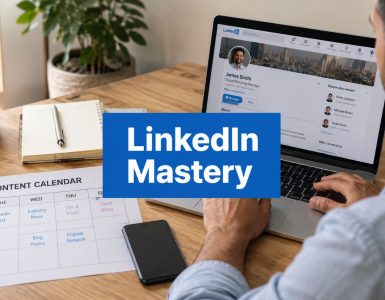
You've probably done this before. You open Canva, grab a design that looked fine on Instagram, upload it to LinkedIn, and then the headline gets clipped, the logo rides too close to the edge, or the whole thing looks smaller than expected in the feed.
That's why linkedin graphic size matters more than most quick-reference lists admit. The numbers are only half the job. The other half is understanding why those ratios keep showing up, where LinkedIn tends to crop, and how to build template files that your team can reuse without fixing every post by hand.
The practical goal isn't memorizing dimensions. It's building a small set of dependable templates that work for profile branding, feed posts, articles, and ads, then pushing those assets through tools like Canva, Buffer, and your scheduling workflow without surprises.
The Complete LinkedIn Graphic Size Cheat Sheet 2026
Your fastest win is to stop designing every asset from scratch. LinkedIn's core visual specs have stayed consistent enough across major 2026 guides that most social teams can treat a handful of sizes as evergreen production standards, especially for templates and recurring content types, as noted in this social media image sizes reference.

If you want one page bookmarked beside Canva or Photoshop, use this set.
| Asset | Recommended size | Common ratio | Best use |
|---|---|---|---|
| Personal profile photo | 400 × 400 px | 1:1 | Headshot or personal brand photo |
| Personal profile cover | 1584 × 396 px | Wide banner | Personal branding header |
| Company logo | 400 × 400 px | 1:1 | Page identity, comment icon, company presence |
| Company cover image | 1128 × 191 px | Wide banner | Company page header |
| Feed landscape post | 1200 × 627 px | 1.91:1 | Link previews, wide promotional graphics |
| Feed square post | 1080 × 1080 px | 1:1 | Quote cards, single-image posts, simple visuals |
| Article cover image | 1200 × 644 px | Near-landscape | LinkedIn articles |
| Carousel slide | 1080 × 1080 px | 1:1 | Slide-based educational posts |
| Portrait feed option | 1080 × 1350 px | Vertical | Mobile-first visual posts |
A second shortcut is knowing which sizes deserve permanent templates and which ones are situational. For creative departments, the permanent set is profile, company cover, horizontal feed, square feed, article cover, and carousel.
If you manage multiple channels, this broader social post dimensions guide for 2025 is worth keeping nearby so your LinkedIn templates stay aligned with the rest of your publishing stack.
Practical rule: If you only build three reusable content templates for LinkedIn, make them 1200 × 627, 1080 × 1080, and 1080 × 1350.
Personal Profile and Company Page Branding Sizes
Your profile visuals do a different job than feed graphics. Feed posts earn attention. Branding assets establish credibility before someone reads a word.

For personal branding, keep the basics clean. Use a 400 × 400 px personal photo and a 1584 × 396 px profile cover. For company pages, use a square logo and a much shorter banner. The exact banner is where most pages go wrong, because designers treat it like a website hero image when it behaves more like a narrow strip.
Personal profile assets
A personal LinkedIn page works best when the profile photo is simple and the banner does the storytelling. The headshot should be centered and cropped with breathing room, because LinkedIn turns that square into a circular display in practice.
The banner is where people overdesign. Don't fill the full width with text. On different screens, the profile image overlaps part of the banner area, and mobile viewing tightens the usable space even more.
Use this working layout:
- Left side caution: Don't place your main headline, logo, or CTA where the profile image can overlap it.
- Center-safe message: Put your role, positioning line, or short value proposition closer to the middle.
- Right side support: Use secondary visuals, subtle shapes, or background texture on the far right.
Keep the banner readable without depending on small text. If the message only works at full desktop width, it won't survive the real world.
Company page assets
Company pages need even more restraint. The page logo should stay crisp at small display sizes, so don't upload a logo lockup with a tiny tagline baked in. It will disappear.
The cover image is short and wide, which means it favors one message, not six. Use a product category, a campaign theme, or a short brand promise. Avoid paragraphs, dense icon grids, and screenshots with fine detail.
A clean company page setup usually follows this checklist:
- Use one focal point. Product image, team visual, or simple branded graphic.
- Limit text. One headline is enough.
- Test at small size. Zoom out before exporting. If it becomes mush, simplify it.
- Match brand system. Use the same fonts and color tokens as your feed templates.
Safe zones that save you rework
Safe zones matter more than the raw linkedin graphic size itself. Plenty of correctly sized images still fail because important content sits too close to the edges or under interface elements.
For banners, leave generous empty margins on the far left and along the top and bottom. For logos, keep the symbol centered with internal padding so LinkedIn doesn't make it feel cramped. If you build in Canva, create guides or colored boxes on a hidden layer labeled “no text” and “safe text area.” That one extra minute pays off every time someone duplicates the template later.
Mastering LinkedIn Feed Post Image Sizes
The feed is the daily production line, and a good linkedin graphic size workflow here saves the most hours.
For standard single-image posts and shared-link visuals, 1200 × 627 px at a 1.91:1 ratio remains the most widely used production benchmark, while 1080 × 1080 px is the common square format because it holds up cleanly across devices and takes more vertical space in the feed, according to this LinkedIn photo size 2026 guide.
That sounds simple, but the actual decision is format choice. Most creators don't need more sizes. They need clearer rules for when to use each one.
When landscape still makes sense
Horizontal images work because they are predictable. They fit shared links, promotional graphics, webinar announcements, and wide layouts with a headline on one side and an image on the other.
Use 1200 × 627 px when:
- You're sharing a URL and want the visual to align with common link-preview behavior
- The design depends on width, such as event banners or side-by-side layouts
- The post is desktop-friendly by nature, such as product screenshots or interface callouts
What usually fails in horizontal layouts is tiny copy. A lot of designers try to fit too much information into a relatively shallow canvas. On mobile, that turns into unreadable clutter. If the visual needs more than a strong headline, a sub-line, and one focal graphic, you probably need a different format.
Why square is the workhorse
Square is the easiest template to standardize across a content team. It gives you more vertical presence than horizontal formats without making layout too complicated, and it behaves well when repurposed into carousel cards or quote posts.
Square is a strong default for:
| Content type | Why square works |
|---|---|
| Quote graphics | Keeps the message centered and readable |
| Thought leadership cards | Gives enough room for headline plus supporting line |
| Product or feature spotlights | Frames screenshots, mockups, or objects cleanly |
| Branded educational posts | Balances text and visual hierarchy |
Square also reduces production friction. If your team runs recurring series like “3 tips,” “client question,” or “weekly insight,” one square template with a few locked brand elements can handle all of them.
A quick visual explainer helps if you're training teammates or clients on format choices.
Carousels need consistency more than creativity
Carousel posts are less about one perfect graphic and more about slide discipline. The common format is 1080 × 1080 px per slide. Keep every card the same dimensions, same margins, same footer treatment, and same type scale.
A solid carousel structure looks like this:
- Title card with one promise
- Problem or setup
- Point one
- Point two
- Point three
- Wrap-up or CTA
Don't redesign each slide from scratch. Build one master slide with locked margins, page number position, and headline styles, then duplicate it.
Feed design rules that hold up in practice
The file size details vary by source, but the practical rule doesn't. Export clearly, compress lightly, and keep critical text away from the edges.
Use these habits every time:
- Leave edge padding: Text, logos, and icons need breathing room.
- Design at target size or above: Never drag a tiny source file up and hope LinkedIn fixes it.
- Check mobile first: If the headline isn't readable on your phone, the post isn't ready.
- Use fewer words on-image: Let the caption carry detail. The graphic should stop the scroll, not explain everything.
The Landscape vs Portrait Debate for Mobile Feeds
You build a post that looks clean on desktop, schedule it, check LinkedIn on your phone, and the graphic barely holds any screen space. That is usually the moment teams stop treating orientation as a style choice and start treating it as a distribution choice.
The fundamental question is simple. Do you want the image to support a click, or do you want it to win attention inside the feed?
A wide 1200 × 627 file still makes sense for link previews, article promotion, and any creative built around a broad composition. Taller formats such as 1200 × 1500 or 1080 × 1350 usually perform better for feed-first posts because they claim more vertical space on mobile. That extra height gives your headline, visual hook, and brand cues more room before the caption does the rest.
When a horizontal layout is the practical choice
Use a wider canvas when the post points to an external destination and the image is supporting that click. It is also the safer option when the same asset needs to work across several channels without extra production time.
That applies to:
- Article promotion
- Event registration posts
- Landing page campaigns
- Webinar graphics
- Any creative cropped from a wide photo or screenshot
If your team publishes long-form content regularly, pair that format with a separate article template instead of forcing a feed-first design into a link-first job. This matters even more if you also publish newsletters or repurpose posts into articles later. A clean process for posting articles on LinkedIn starts with using the right canvas from the beginning.
When a taller format is worth the extra template work
Taller posts work best when the value is on the graphic itself. Educational posts, quote cards, process visuals, and single-message announcements usually benefit from the added height because the design has room to breathe on a phone screen.
I use this format for content that needs three things: a strong first line, clear hierarchy, and enough padding that nothing feels cramped in the mobile feed.
Typical use cases include:
- Educational graphics
- Quote-led posts
- Framework visuals
- Short announcements
- Creator-style posts built for feed attention
The trade-off is production overhead. Taller files often need their own Canva template, their own safe-zone guides, and a separate export check before scheduling in Buffer or EvergreenFeed. That extra setup is worth it if the post is meant to teach, persuade, or stop the scroll without relying on a click.
The decision rule I use in production
Match the canvas to the job.
If the post is click-first, start wide. If the post is feed-first, test a taller format. If your team wants one reusable fallback for organic posts, square is usually the best compromise because it is easier to template, easier to crop consistently, and stronger on mobile than a shallow wide image.
To ensure workflow beats opinion, build three master templates in Canva. Wide, square, and tall. Add fixed margins, a headline safe zone, and a logo position that never changes. Then your team can choose the format based on post objective instead of redesigning from scratch every time.
Dimensions for LinkedIn Articles and Newsletters
Articles and newsletters get mishandled because teams often recycle a feed graphic and assume it will behave the same way. It doesn't. A post image and an article header solve different presentation problems.
For long-form publishing, use a separate template. The commonly recommended article cover size is 1200 × 644 px, which gives you a slightly different shape than the standard feed wide-format image mentioned earlier. That small difference matters when you're placing type, illustrations, or branded framing.
What to build for article visuals
Article graphics should act like editorial headers, not promo banners. Use a strong title treatment, a restrained amount of supporting design, and more whitespace than you'd use on a normal feed post.
A reliable article-cover template should include:
- Headline area with short, high-contrast text
- Visual anchor such as an abstract graphic, simple icon, or brand photo
- Wide safe margins so the image still reads if LinkedIn previews it tightly
- Minimal footer branding rather than a large logo block
Newsletter workflow and repeatable ratios
LinkedIn's broader visual system has converged around a small set of repeatable ratios across posts, carousels, stories, and branding assets, which makes template systems easier to maintain over time, as outlined in this LinkedIn post specs overview. That stability is useful for newsletters because you don't need a brand-new design system for every publishing format.
If you already maintain square feed cards, horizontal post images, and one article-header template, you've covered most long-form needs. The trick is naming and organizing them correctly so nobody on the team grabs the wrong file.
A simple folder setup works well:
| Folder | Template inside |
|---|---|
| LinkedIn Feed | Landscape, square, portrait |
| LinkedIn Long Form | Article cover, newsletter header variant |
| LinkedIn Carousel | Master deck, title slide, ending CTA slide |
| LinkedIn Branding | Personal banner, company cover, logos |
If you publish through a broader content workflow, this guide on how to post articles on LinkedIn helps connect the visual side with the actual publishing process.
What not to do
Don't use a crowded webinar graphic as an article cover. Don't reuse a carousel slide with heavy text blocks. And don't assume a feed template with edge-to-edge design will survive article preview behavior.
Plain editorial visuals usually work better here. The goal is credibility and clarity, not squeezing a whole campaign into one header.
LinkedIn Ad Campaign Graphic Specifications
Organic content gives you some room for experimentation. Paid creative gives you less. When the asset is going through an ad platform, wrong dimensions create delays, awkward previews, and wasted production cycles.

The simplest way to handle LinkedIn ads is to stop thinking in terms of “all ad sizes” and think in terms of creative families. Focus on single-image ads, carousel ads, and video thumbnails. Build template sets for those three, and you remove most avoidable ad-design errors.
For a current practical reference beyond your own saved templates, keep these updated LinkedIn ad formats on hand while trafficking campaigns.
Single-image ads
Single-image ads usually work best when you design them like disciplined feed posts, not mini landing pages. The familiar 1200 × 627 px horizontal format is the safest creative baseline for sponsored content because it aligns with the standard wide-feed approach already used across LinkedIn publishing.
Use it when you need:
- Direct-response visuals tied to one offer
- Event promotion
- Lead-gen creative
- Retargeting ads with one sharp message
The most common mistake is adding too much sales copy into the image itself. Paid creative already carries headline, intro text, and CTA controls in the ad unit. If you also cram the graphic with text blocks, the ad starts to feel noisy fast.
Carousel ads
Carousel ads benefit from the same discipline as organic carousel posts. Keep all cards in one ratio, keep branding subtle, and make sure each card can stand on its own while still feeling part of a sequence.
A practical carousel ad build looks like this:
- Card one hooks the audience
- Middle cards advance one idea at a time
- Final card closes with the offer or next step
Use square creative when you want clean consistency and easier design repurposing from organic content. That makes approvals faster because the same master layout can often be adapted for both paid and organic use.
Video ads and thumbnails
The video itself matters most, but the thumbnail still shapes whether the asset looks intentional inside the campaign. Use a thumbnail that matches the video framing, includes readable headline text if needed, and avoids cluttered screen grabs.
Good ad thumbnails usually include:
- One focal subject
- Short overlay text
- High contrast
- Brand marker in one corner, not a giant logo strip
Paid creative needs more restraint than organic creative. Ads already carry surrounding interface elements. Your image should simplify the message, not compete with the platform chrome.
A workable ad production system
If you're running several campaigns per month, create a master ad kit in Canva, Figma, or Photoshop with:
| Template group | What to include |
|---|---|
| Single image ads | Landscape master, alternate background versions, CTA-safe text area |
| Carousel ads | Square card system, card number style, ending slide pattern |
| Video support | Thumbnail frame, end card, static fallback image |
| Brand controls | Approved fonts, logo versions, color palette, export settings |
For campaign planning and placement choices, this breakdown of LinkedIn ad types is useful because it connects the creative format to the actual ad objective instead of treating every asset as a generic social graphic.
Your Practical Workflow for Perfect Graphics
A clean linkedin graphic size workflow starts before design. The teams that move fastest don't just know dimensions. They know which templates exist, where those templates live, and which export settings belong to each content type.
Build once and reuse
In Canva, create one brand folder with subfolders for LinkedIn Profile, LinkedIn Feed, LinkedIn Articles, and LinkedIn Ads. Inside each, make master templates and label them by ratio first, not campaign name.
A naming structure like this keeps things usable:
- LI Feed 1200×627 Master
- LI Feed 1080×1080 Quote
- LI Feed 1080×1350 Mobile
- LI Article 1200×644 Header
- LI Carousel 1080×1080 Deck
- LI Ad 1200×627 Sponsored
That naming convention sounds boring. It saves hours because nobody has to guess which “Final-v2-new” file is the right one.
Set up safe zones inside the template
This is a frequently skipped step. Add hidden guide boxes directly in the template.
Use color-coded layers such as:
- Red outer margin for no text or logos
- Yellow zone for optional secondary elements
- Green center area for headline and primary message
Lock those guides. In Canva, keep them on a hidden page labeled “Read me” or lock them behind the design. In Photoshop, use guides and grouped layers with labels. In Figma, use layout grids and a locked annotation frame.
If your team needs a Slack explanation every time they make a post, your template isn't finished yet.
Export settings that avoid common quality issues
Use PNG for graphics with text, logos, charts, and flat-color design. Use JPG for photographic posts where file weight matters more and the image doesn't rely on razor-sharp text edges.
Then compress before upload. TinyPNG is still a practical option for reducing weight without visibly wrecking a clean export. The goal is simple: preserve clarity while avoiding unnecessarily heavy files.
A dependable pre-publish checklist looks like this:
- Confirm ratio first
- Check text size on mobile
- Export in the right format
- Compress lightly
- Preview the final file before scheduling
Connect design to scheduling
Design consistency falls apart when file handling is messy. Save final exports into folders that match your scheduling flow, such as Thought Leadership, Promotions, Blog Posts, Quotes, and Case Study Graphics.
If you schedule in Buffer, keep asset names and post themes aligned so a teammate can find the right image without opening five folders. For teams building repeatable queues, EvergreenFeed can sit on top of that Buffer workflow by organizing evergreen posts into buckets and pushing them out on preset schedules, which is useful when you're rotating recurring visual formats across accounts.
Your graphics also need to match the content plan, not just the canvas size. A sharper system starts with clear post categories, recurring formats, and publishing intent. This LinkedIn posting strategy is a useful companion read if you want the design workflow to line up with what you're trying to publish.
What works and what doesn't
What works is a small template library, locked brand rules, mobile checks, and clean filenames.
What doesn't work is designing every post from a blank canvas, stuffing too much copy into images, and letting different team members invent spacing rules on the fly.
You don't need more size charts. You need fewer decisions.
Frequently Asked LinkedIn Image Questions
Why do uploaded images look blurry on LinkedIn
Usually because the source file was too small, the export setting was wrong, or the design packed in text that was already borderline unreadable before upload. Start with the proper canvas size, export cleanly, and avoid stretching low-resolution assets upward.
Does LinkedIn compress images
Yes, in practice you should expect some platform processing after upload. The safest response is not to fight that with oversized chaos. Export a crisp final file, compress it lightly yourself, and keep text large enough that minor processing won't ruin legibility.
Should I use PNG or JPG
Use PNG for quote cards, diagrams, charts, logos, and any design with text overlays. Use JPG for photos and image-led posts where file size efficiency matters more than edge sharpness.
Why does a correctly sized graphic still crop badly
Because correct dimensions don't guarantee safe composition. If your headline sits on the outer edge, or your logo hugs a corner, different previews can still make the design feel cramped. The fix is better margins, not just the right canvas.
Can I use one template for every LinkedIn post
You can, but you probably shouldn't. One wide template for everything creates weak results fast. A practical setup is one wide, one square, one portrait, and one carousel master. That gives you enough flexibility without turning your design system into a mess.
Can I use a GIF for my profile photo
LinkedIn branding visuals work best when they stay simple and professional. For profile identity, static images are the safer choice because they're easier to control and keep consistent across devices and contexts.
If you want your LinkedIn graphics to keep working after you've built them, EvergreenFeed helps you organize evergreen posts into reusable buckets and send them through Buffer on a set schedule, so your finished templates don't just sit in a folder waiting for someone to remember them.