Your Instagram probably doesn't feel disorganized because you lack ideas. It feels disorganized because everything lives in different places. Photos sit in your camera roll, draft captions hide in Notes, product shots are buried in Dropbox, and every posting day starts with the same question: what can I publish right now without scrambling?
That's the trap individuals often fall into when they try to learn how to organize IG posts. They think organization means designing a pretty grid. In practice, a pretty grid without a system becomes fragile fast. One late promo, one last-minute testimonial, one missing asset, and the whole plan falls apart.
The better approach is operational. Build a content system that can keep publishing even when you're busy, uninspired, or pulled into ten other marketing tasks. That matters even more now because 78% of social media managers prioritize consistent posting over perfect grid aesthetics, and automated evergreen rotation has been shown to increase reach compared to manual posting, according to this 2025 social trends discussion.
Moving Beyond the Perfectly Manicured Grid
A manually curated grid looks good in screenshots. It usually performs badly as a long-term workflow.
The old method goes like this: move tiles around in a preview app, pin too much importance on how row three looks next to row four, delay posting because the next image “doesn't fit,” then lose momentum. Teams spend more time protecting the layout than publishing useful content.
Practical rule: If your Instagram system breaks every time an unscheduled post appears, you don't have an organized account. You have a brittle layout.
A modern Instagram workflow treats your feed as a living content library, not a fixed art board. That changes how you plan everything. Instead of asking, “What photo belongs in this square?” ask, “What category of content should publish next, and do I already have approved assets ready?”
That shift solves three common problems at once:
- Decision fatigue: You stop choosing from your entire camera roll every day.
- Inconsistency: Your account doesn't go silent because you ran out of perfectly matching images.
- Content waste: Good evergreen posts don't disappear after one use.
What actually works now
The accounts that stay active usually rely on repeatable buckets. Think tutorials, customer proof, offers, product education, behind-the-scenes moments, and community content. Those buckets make scheduling easier because you're planning categories, not one-off posts.
A polished feed still matters. It just shouldn't dictate the whole strategy. Visual consistency should support publishing, not block it.
What usually doesn't work
Rigid manual pinning and grid micromanagement create hidden costs. Someone always has to babysit the queue. Someone always has to re-check spacing. Someone always has to patch the calendar when real business priorities interrupt the aesthetic plan.
Consistency beats visual perfection when your goal is sustained audience growth, not a one-time profile makeover.
If you've been organizing Instagram by dragging mock tiles around and hoping you'll “figure out the rest later,” flip that process. Start with the system that keeps content moving. Then make the visuals fit inside that system.
Build Your Content Foundation System
Most Instagram chaos starts before design. It starts with storage.
If your assets are spread across phones, laptops, Canva downloads, old campaign folders, and direct messages, you're going to waste time every week just locating what you already made. The cleanest fix is a centralized hub. According to Jenn's Trends on organizing Instagram content, syncing devices to one cloud-based system and migrating 100% of photo content into organized folders is the single most impactful step for staying on top of posting schedules.

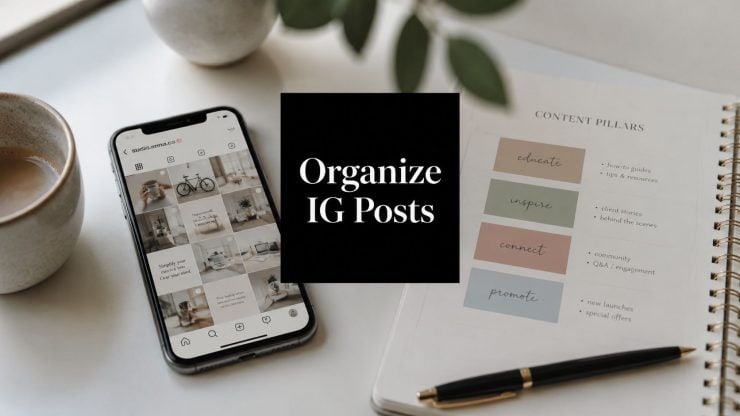
Start with pillars, not posts
Before you build folders, define the few content pillars your account needs. Keep them broad enough to repeat and specific enough to guide creation.
A practical setup might look like this:
- Education: How-to carousels, short tips, myth-busting graphics
- Engagement: opinion prompts, questions, simple community posts
- Trust: testimonials, user-generated content, proof of work
- Promotion: launches, service offers, product spotlights
- Brand personality: founder perspective, behind the scenes, team moments
These pillars become your operating system. Every future asset should fit into one of them.
Turn pillars into buckets
Buckets are the repeatable post types inside each pillar. Content becomes schedulable within them.
For example:
| Pillar | Buckets |
|---|---|
| Education | how-to carousel, checklist graphic, mini tutorial Reel |
| Trust | customer quote, user-generated photo, case example |
| Promotion | feature highlight, limited-time offer, lead magnet |
| Brand personality | desk setup, process snapshot, founder note |
This structure matters because it stops you from reinventing the wheel. “Need a post for Thursday” is too vague. “Need one trust post from the user-generated content bucket” is actionable.
Build the folder system to match
Use Google Drive, Dropbox, or another shared cloud space. The point isn't the platform. The point is that everyone knows where assets live.
A simple folder tree works well:
- Content Pillars
- Education
- Engagement
- Trust
- Promotion
- Brand
- Within each pillar
- Final images
- Video clips
- Caption drafts
- Design templates
- Archived top performers
The folder structure should mirror the way you schedule. If your scheduler uses buckets, your drive should use buckets too.
Add naming rules early
Messy file names create a lot of hidden friction. Don't leave exports named “final-final-2.png.”
Use a naming pattern like:
- brand-topic-format-month
- product-feature-carousel
- testimonial-client-type-quote
- spring-sale-story-set
That makes search faster and handoff cleaner, especially when multiple people touch the account.
The biggest win here isn't visual. It's speed. Once your content foundation is organized, planning stops feeling like hunting and starts feeling like selecting.
Plan Your Visual Theme and Grid Layout
A strong visual system should make posting easier, not more stressful. The feed needs enough consistency to look intentional, but enough flexibility to handle real content flow.

The simplest way to do that is to choose a few visual rules and repeat them. Stick to a palette of 3–5 signature colors, mix minimal and busy images, vary your angles, and use filler photos every 2nd to 5th post to create rhythm, based on this guide for organizing an Instagram feed visually.
Choose constraints you can actually maintain
Don't copy a design-heavy aesthetic if your content comes from daily phone photos. Pick a style that matches your production reality.
A workable visual system usually includes:
- One editing direction: bright and airy, muted neutrals, high contrast, or documentary-style natural light
- One design language: same fonts, recurring text placement, similar border or spacing treatment
- One content rhythm: photo, graphic, carousel, quote, then repeat with variation
Many feeds see quick improvement. They don't need more creativity. They need fewer design decisions.
Use filler content the right way
Filler photos get a bad reputation because people assume they're low value. Used well, they create breathing room between dense educational posts, promo-heavy graphics, or visually busy carousels.
Examples of useful filler content:
- workspace detail shots
- simple product close-ups
- cropped texture or packaging images
- quiet behind-the-scenes moments
- minimalist brand visuals
These posts aren't there to carry the entire strategy. They're there to keep the grid from feeling crowded and repetitive.
A feed looks organized when adjacent posts don't compete for attention.
Plan for flexibility, not symmetry
Perfect checkerboards and row themes can work for a short campaign. They're harder to maintain across an active business account with launches, updates, and community content. A flexible visual system performs better because it can absorb change.
Use a preview tool if you want to sanity-check balance before publishing. If you need help thinking through layout flow and profile appearance, this guide to an Instagram grid preview is a useful reference point.
A practical visual checklist before scheduling:
- Color balance: are your recent posts all dark, all pink, or all text-heavy?
- Format variety: did you repeat the same template too many times?
- Subject variation: are the last few posts all headshots, all products, or all screenshots?
- Spacing: does the feed need a quieter image between dense designs?
That's enough control without turning the grid into a daily puzzle.
Develop Your Editorial Calendar and Schedule
Content gets easier the moment it has a home on the calendar. Until then, it stays theoretical.
The best Instagram calendars don't try to predict every creative whim. They assign categories to days, leave room for timely content, and make sure the account keeps moving. For most brands, that's the difference between “we post when we can” and “we have an actual publishing rhythm.”

According to Business.com's Instagram best practices, businesses should post 3–5 times per week, with the best posting window at 10 a.m. to 2 p.m. on Mondays through Thursdays. The same source recommends the 5:3:2 rule, meaning for every 10 posts, five should educate, three should drive engagement, and two should build relationships.
Turn buckets into a weekly pattern
Don't start by filling every date. Start by assigning a role to each publishing day.
A simple weekly model might look like this:
| Day | Content role |
|---|---|
| Monday | educational carousel |
| Tuesday | engagement post |
| Wednesday | trust or community content |
| Thursday | educational Reel or single image |
| Friday | relationship-building or light brand post |
That framework keeps the mix healthy without making the calendar feel rigid.
If you want a clean starting point, a good social media posting schedule template can save you from building one from scratch.
Build one month ahead
Monthly planning is usually the sweet spot. It's far enough ahead to batch work, but close enough to adjust for campaigns, launches, and seasonal shifts.
Keep these layers separate in your calendar:
- Fixed content: launch announcements, sale posts, event reminders
- Evergreen content: tutorials, FAQs, testimonials, recurring tips
- Flexible slots: news-based posts, reactive content, trend participation
This prevents one urgent campaign from wiping out the rest of your schedule.
If every slot on your calendar is promotional, your audience feels it immediately.
After you set the monthly view, mark which posts are already complete, which need assets, and which only need copy. That lets you see bottlenecks before posting week arrives.
For teams that need a more structured planning view, this walkthrough on building a content calendar for Instagram is worth bookmarking.
A short walkthrough can help if you want to visualize a practical setup:
Make scheduling operational
A calendar only works if publishing from it is easy. Meta Business Suite is a solid option for scheduling and monitoring. Spreadsheet users can keep control with a simple status column system such as idea, in production, approved, scheduled, and published.
The strongest calendars answer five questions at a glance:
- What's posting this week?
- Which bucket does each post belong to?
- Is the asset finished?
- Is the caption approved?
- Has it been scheduled at the right time?
Once those answers live in one place, consistency stops depending on memory.
Create Reusable Caption and Hashtag Templates
Many accounts look organized visually but fall apart in the caption field. That's why posting still feels slow even after the images are ready.
Captions should be templated by post type. Not scripted word-for-word, but structured enough that you're not staring at a blank box every time. The same goes for hashtags. Store them by category so you can adapt quickly instead of rebuilding sets from scratch.
According to Sprout Social's Instagram best practices, posts with exactly three hashtags earn the highest average engagement rate of 3.4% based on Socialinsider research. The same guidance also recommends using a mix of 5 to 10 specific and widely used hashtags to expand exposure.
Build caption frameworks by bucket
A promotional caption shouldn't be written the same way as a tutorial or a community post. Give each bucket its own formula.
Examples:
Educational post
- Hook
- one practical lesson
- short takeaway
- simple call to save or share
Trust post
- customer situation
- what changed
- why it mattered
- invitation to ask questions
Engagement post
- opinion starter
- two choices or one direct question
- prompt for comments
These frameworks make writing faster because the structure is already decided.
Save modular lines you reuse often
Most brands repeat the same kinds of prompts. Store them in one document.
Keep a swipe file with items like:
- CTA lines for saving, sharing, commenting, or clicking bio
- short brand descriptors
- product positioning phrases
- FAQ answers
- intro lines for launches, tips, testimonials, and reminders
This is one of the easiest ways to reduce approval time. Instead of writing every caption from zero, you're assembling from approved parts.
The fastest caption is rarely the shortest one. It's the one built from a repeatable structure.
Organize hashtags in layers
Don't keep one giant list. Group hashtags by intent.
A practical setup:
| Set type | What goes in it |
|---|---|
| Niche | tightly relevant terms for your exact topic |
| Industry | broader category terms people in your field follow |
| Campaign | branded or event-specific tags |
| Location | local discovery if geography matters |
Then create saved sets for each content bucket. A tutorial post shouldn't use the same tag group as a testimonial or local event recap.
The key trade-off is clarity versus reach. Broad tags may expose content to larger pools, but highly specific tags usually match intent better. Test combinations, keep what fits your content, and don't stuff every post with the same repeated block.
Automate and Optimize Your Content System
Manual posting works until your workload increases. Then it becomes the first thing to slip.
That's why the strongest Instagram systems don't stop at folders, calendars, and templates. They add automation. Once your content is categorized properly, automation stops feeling risky because the logic is already built into the system.

What automation should handle
Automation is best for repeatable publishing decisions, not sensitive brand judgment. Use it to keep approved content moving, especially evergreen posts that stay useful over time.
Good candidates for automation include:
- tutorial posts with lasting relevance
- recurring FAQs
- testimonials that aren't time-sensitive
- blog promotions tied to evergreen articles
- quote graphics and educational reminders
Poor candidates include urgent announcements, crisis communication, and posts that depend on current context.
Why evergreen rotation beats manual reshuffling
Most “organized feed” advice still assumes you'll hand-pick every post forever. That's not sustainable for active accounts. A better model is evergreen rotation. You load approved posts into categories, assign publishing times, and let the system surface content from those buckets without daily intervention.
That approach is especially useful for brands with large back catalogs. Old educational posts, customer proof, and recurring tips often still have value. If they're buried after one use, you're leaving useful content idle.
If you're exploring this workflow, this guide to automating Instagram posts outlines the mechanics clearly.
Organization becomes durable when publishing no longer depends on someone remembering what to post at 11:30 a.m.
Optimization still matters
Automation isn't “set it and forget it.” It's “set it so you can improve it.”
Review your performance regularly and look for patterns such as:
- which buckets consistently attract saves or replies
- which visual formats feel overused
- which caption structures drive conversation
- which content types deserve more production time
- which low-value posts should be retired from rotation
This feedback loop is what separates a busy account from a smart one. You're not automating for the sake of convenience alone. You're creating space to make better decisions.
A well-organized Instagram system should feel boring behind the scenes. Files are easy to find. Captions have a structure. Categories are clear. The queue keeps moving. That's what lets the front end look polished without requiring constant manual effort.
If you want that kind of repeatable workflow, EvergreenFeed is built for it. You can organize posts into content buckets, connect Buffer, set posting schedules by category, and keep evergreen Instagram content circulating without having to manually queue every post yourself. It's a practical way to stay consistent when you're done babysitting the grid.