So, you want to create a custom location for your business on Instagram? It's a common question, and the answer isn't as straightforward as you might think. You can't actually create a new location directly inside the Instagram app.
The secret is to go through Facebook. You must first create the location on Facebook using its "Check In" feature. Once that's done, it syncs up with Meta's system and becomes a taggable spot on Instagram.
Why a Custom Instagram Location Matters
Trying to get found locally on Instagram can feel like shouting into the void. Tagging your city is fine, but your post just gets lost in a sea of other content. A custom location tag, on the other hand, turns your business into a specific, real-world destination. It makes it incredibly easy for customers to find you, visit, and share their experience.
This isn't just about having a cool, branded tag. It’s a seriously practical tool for local discovery. Every time a customer tags your unique location, they're contributing to a user-generated content hub for your business. Think of it as a living digital scrapbook, filled with genuine photos and endorsements from real people, all neatly organized under your brand's geotag.
Boost Your Local Visibility
A custom location is a simple but powerful way to stand out. We've seen that custom Instagram locations (created via those Facebook check-ins) can increase a business's appearance in local searches by a whopping 40%. Businesses using them also tend to get 28% more profile actions, and their tagged posts see 12% more saves and shares.
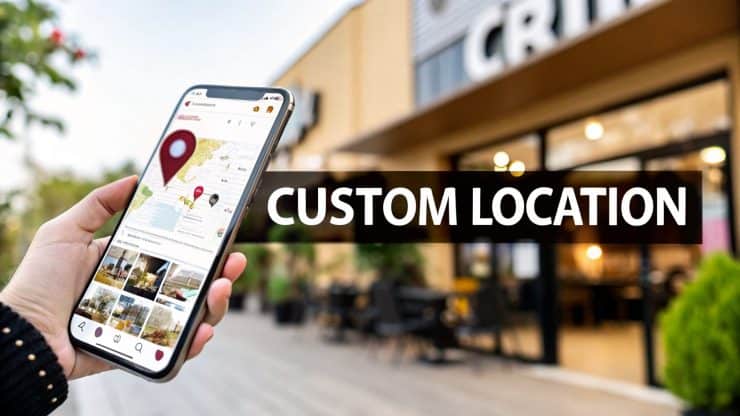
This one small step signals to the algorithm that you're a legitimate business with a physical footprint, which gives your local SEO a nice boost. The image below shows exactly where this pays off—the location search tab within Instagram.
This search function is precisely why having a unique, branded location is so crucial for helping new customers find you.
Drive Foot Traffic and Build Community
A custom location tag does more than just boost your online profile; it actively encourages people to walk through your door. When you make it easy for someone to tag your spot, you’re turning a happy customer into a micro-influencer for your brand.
Imagine a local coffee shop with its own custom tag. It quickly becomes a gallery of happy customers sipping lattes and enjoying the vibe, attracting new visitors who see their friends posting from your cafe. For more ideas on this, check out our guide on how to get more engagement on Instagram.
This principle of building a visible, engaging brand presence on social media goes hand-in-hand with customer retention. As you grow, it's worth exploring proven loyalty strategies for small business growth to see how top brands build a dedicated following that keeps coming back.
Creating Your Location Tag Through Facebook
So, you want to create a custom location for your brand on Instagram? Here's the secret: you don't actually do it on Instagram. The whole process runs through its parent company, Meta, which means you’ll be using the Facebook app to get your location on the map.
Before you even start, make sure you've enabled location services for the Facebook app on your phone. This is a small but crucial step that the whole process depends on.
With that out of the way, open your Facebook app and begin creating a post as you normally would. Look for the “Check In” option. This is your gateway. Tap it, and in the search bar that pops up, type the exact name you want for your new location.
It’s tempting to skip this search if you know the location doesn't exist, but don't. You have to perform the search first. Once Facebook confirms it can't find a match, you’ll see an option to "Add a new location" appear at the bottom of the results. That's the one you want.
Defining Your New Place
This next part is where precision matters most. Any mistakes here can get your location rejected or, worse, make it impossible for customers to find you. Take a moment to get these details right.
- Name: Be specific. Think like your customer. They're more likely to search for "The Daily Grind Coffee House" than a generic "Coffee Shop."
- Address: You need a real, physical street address. Facebook’s system uses this to validate the location, so a P.O. box won't cut it.
- Category: Pick the most accurate category for your business. This is what helps you show up when someone is browsing for "bakeries" or "boutiques" in their area.
A simple typo can be the difference between your location showing up instantly and it never appearing at all. I’ve seen it happen. Double-check everything—especially spelling and the address—before you hit submit.
Getting this right isn't just about a pin on a map; it's about turning online eyeballs into real-world customers.

As you can see, a discoverable location is the first step toward driving foot traffic and building a loyal local community around your brand.
To finalize the setup, you just have to publish your Facebook post with the new location "checked in." This is the action that officially registers your spot with Meta's database.
Of course, this entire method hinges on a proper connection between your accounts. If you're not sure, it's worth taking a look at our guide on how to link your Facebook and Instagram accounts.
Once you've posted, be patient. It can take a little while—sometimes up to 48 hours—for the new location to sync and become searchable on Instagram.
Alright, you’ve gone through the process and your shiny new custom location is live. But creating it is only half the battle. Now, you have to actually use it.
Think of your new location tag as a digital breadcrumb trail. Every time you use it, you leave another clue for local customers to find their way to you.

The most straightforward way to get started is to tag your location in every single relevant post, Story, and Reel you publish. When you add that tag, you're not just labeling your content—you’re plugging it directly into your local community’s feed.
Boost Your Local Reach and Engagement
The data doesn't lie: geo-tagged content gets a massive 2.8 times more engagement than posts that don't have a location. It’s a tiny step in the publishing process that yields huge results for your visibility. If you want to dive deeper into the numbers, Later.com published a great analysis on this.
Here’s how to strategically put your location tag to work:
- For Feed Posts: This is your bread and butter. Simply add the location right below your caption before you hit "Share." Make it a non-negotiable part of your posting routine.
- For Instagram Stories: Use the "Location" sticker. This is huge, because it makes your Story eligible to appear in the public location Story. That means people who don't even follow you can discover your brand just by browsing what's happening nearby.
- For Reels: Just like with Stories, you can add a location sticker to your Reels. This helps the algorithm show your Reel to more users in your geographic area.
The goal is to build a rich, discoverable digital footprint. The more content that gets tagged with your location—from you and from your customers—the stronger your local presence becomes on the platform.
Turn Your Profile Into a Real-World Destination
Don't stop at your posts. Your Instagram bio is prime real estate. You can add your physical address directly to your profile by editing your "Contact options."
Once you do, your address becomes a clickable link that opens directly in a map app, giving potential customers turn-by-turn directions right to your front door. It’s an incredibly simple way to bridge the gap between your online marketing and offline sales.
Considering that 45% of users tap these links for directions, this is a must-have for any brick-and-mortar business. You can even encourage customers to check in by offering a small discount or freebie, turning your happy clients into your best marketers.
So you’ve gone through all the steps, but your shiny new location is a ghost on Instagram. It’s a classic, frustrating moment that happens more often than you’d think. Before you start pulling your hair out, take a breath.
The number one reason for this is simply a delay. When you create a location on Facebook, it has to sync up with Instagram's system. While it shows up instantly on Facebook, it can take up to 48 hours to appear on Instagram. My best advice? Give it two full days before you start any serious troubleshooting.
If you’ve waited patiently and your location is still nowhere to be found, it’s time to dig a little deeper. The problem usually traces back to a tiny hiccup during the initial setup on Facebook.
When Your Location Is Playing Hide and Seek
Start with the simple stuff. Are both your Facebook and Instagram apps updated to the latest version? Running an old version can cause all sorts of strange syncing bugs, and a quick trip to the app store is an easy fix.
Also, pop into your phone’s settings and make sure location services are still enabled for the Facebook app. A recent phone update can sometimes reset these permissions without you realizing it, which stops the app from properly registering new places.
Most of the time, location issues stem from that first Facebook check-in post. If it’s still missing after 48 hours, the most reliable fix I've found is to delete the original Facebook post and just create it again. This time, be extra careful with the address and category.
This do-over usually forces the location through Meta's system. When you're re-creating it, pay close attention to the category you choose. A specific category like "Vintage Clothing Store" works much better than a generic one like "Store." Giving the system clear, precise info from the start makes all the difference.
Common Location Problems and Fixes
Still stuck? Let's run through some of the most common snags people hit when creating or using custom locations. I've put together this quick-reference table to help you pinpoint the problem and find the right solution.
| Problem | Potential Cause | Solution |
|---|---|---|
| Location isn't on Instagram | It’s been less than 48 hours since you created it. | Wait a full two days for Meta's systems to sync. Patience is your best friend here. |
| Location still not showing | A glitch during the initial Facebook post creation. | Delete the original check-in post on Facebook and create a new one, carefully re-entering all the details. |
| Can't create the location on FB | Location services for the Facebook app are turned off. | Go to your phone’s settings, find the Facebook app, and ensure location permissions are enabled. |
| The wrong address is showing | A typo was made during setup or the pin was dropped incorrectly. | Re-create the location with the correct address and double-check the map pin's placement. |
| Old/duplicate locations appear | Previous attempts or other users created similar locations. | When tagging, be sure to select your new, official location. If you own the business, you can try to claim and merge duplicate Facebook Pages, which can sometimes clean up the location tags. |
This table should help you diagnose the issue quickly. Remember, nine times out of ten, either waiting a bit longer or simply re-doing the initial Facebook check-in will get your new location to show up exactly where you want it.
Automate Your Geo-Tagged Content Strategy
So, you've created your custom location tag. That’s a fantastic first step, but the real magic happens when you use it consistently without sinking hours into your social media management. This is where you can build a sustainable marketing engine that works for you. Using smart automation tools to put your geo-tag on autopilot is a total game-changer, saving you time while boosting your local visibility.
Think about it from the perspective of a local coffee shop owner. You’ve successfully created the location tag for "The Daily Grind," and now you want to consistently promote your morning specials. Instead of remembering to post every single day, you can use a tool like EvergreenFeed to build a library of evergreen, geo-tagged content.

This simple shift turns a daily manual task into a "set it and forget it" system. It's how you maintain a constant presence in local searches and conversations without the daily grind—pun intended.
Build Your Content Buckets
A great way to start is by organizing your content into "buckets" or categories. For our coffee shop example, you could break it down like this:
- Daily Specials: Gorgeous photos of your latte art or fresh pastries, always tagged with your custom "The Daily Grind" location.
- Behind the Scenes: Quick videos of your baristas dialing in the espresso machine or your baker pulling croissants from the oven.
- Customer Features: Reposting user-generated content from happy customers who have already tagged your shop. It's social proof and fresh content in one!
By batching your content creation and letting an automation tool handle the publishing schedule, you guarantee a steady flow of locally relevant posts. This is one of the most effective ways to make sure your custom location gets the maximum exposure it deserves.
If you want to get really efficient with this, it's worth learning how to automate social media posts to streamline your entire workflow. Tools like EvergreenFeed can integrate with schedulers like Buffer, pulling content from your pre-filled buckets automatically.
You just add new photos and videos to your library whenever you have a spare moment, and the system takes care of the rest. Your profile stays active with fresh, perfectly geo-tagged posts, turning your location tag into a powerful, automated marketing asset.
A Few Lingering Questions About Instagram Locations
Even after you’ve gone through the steps, it’s normal to have a few questions pop up. It’s a bit of a quirky system, after all. Let’s clear up some of the most common things people ask so you can use your new location tag with confidence.
The number one question I get is, "I made my location, but I can't find it on Instagram!" Don't panic. While the new spot shows up on Facebook almost instantly, it needs time to sync with Instagram's system. This can take anywhere from a few hours up to 48 hours. My best advice? Be patient and give it a day or two before you start troubleshooting.
Getting Creative (and Strategic)
Another thing people ask about is creating locations for things that aren't, well, physical places. Can you make a location for your online shop or a weekly virtual event? The answer is yes… with a little creativity.
Since the system is designed for physical addresses, you have to play by its rules. You can definitely create a "conceptual" location like "Weekly Marketing Live Q&A," but it has a much better chance of getting approved if you anchor it to a real-world, general address, like just the city you're based in.
People also wonder if it's better to tag a broad city or their new, custom business location. The difference is huge.
Tagging a big city throws your post into a massive, noisy pool. But when you tag your specific business location, you're reaching a hyper-local audience that is actively looking for what you offer. For driving actual foot traffic, your custom tag is always the more powerful tool.
Using your custom tag cuts through the noise and speaks directly to potential customers nearby. It transforms your posts from simple updates into direct invitations, encouraging local discovery and turning those online views into real-world business.
Stop manually posting and start saving hours every week. EvergreenFeed automates your social media schedule, ensuring your best geo-tagged content is always in front of your local audience. Get started for free today.