
Absolutely. For years, being chained to your phone was just part of the Instagram game. Thankfully, those days are long gone. You can now post directly to Instagram from your computer using Instagram's built-in desktop features or get more strategic with powerful scheduling platforms.
Let's walk through the best ways to manage your content straight from your desktop.
Why Bother Posting to Instagram From Your Computer?
Moving your Instagram workflow from a tiny phone screen to a full-sized monitor is more than just a matter of comfort—it’s a massive strategic upgrade. Imagine crafting detailed captions, managing high-resolution photos, and scheduling a week's worth of content with a proper keyboard and mouse. For anyone serious about their Instagram presence, it's a total game-changer.
This diagram gives you a quick visual breakdown of the main ways you can post from a computer.
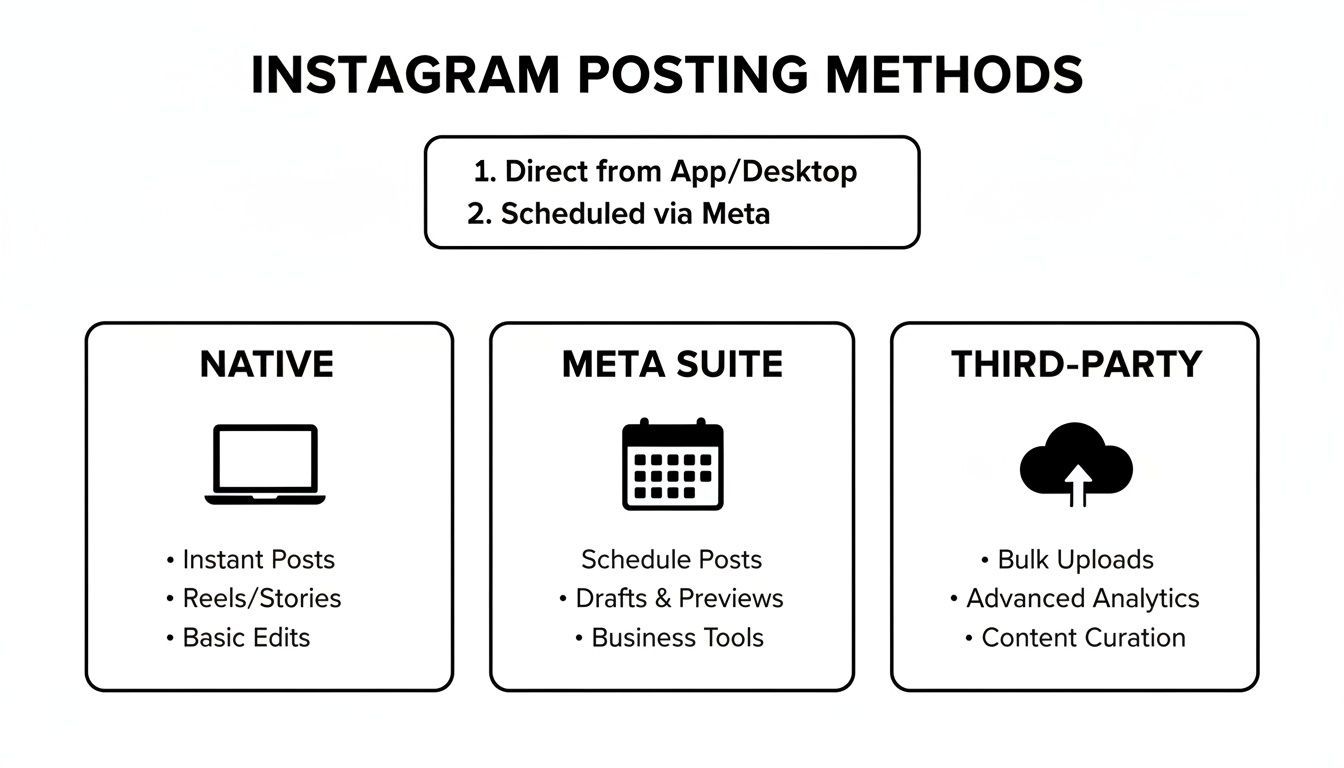
As you can see, each method has its own strengths, whether you need a quick upload or a full-blown scheduling system.
The Real Advantages of Desktop Posting
The benefits you'll see from shifting to a desktop workflow are immediate and have a real impact on both your content quality and your schedule. When you can post to Instagram from your computer, you open the door to a much more organized and professional process.
Here’s what you stand to gain:
- You'll Work Faster: It's simple, really. Typing captions, researching hashtags, and replying to comments is just plain quicker with a real keyboard. Plus, all your brand assets, photos, and video files are right there on your computer, ready to go.
- Your Content Will Look Better: Editing photos and videos on a large, properly calibrated monitor makes a world of difference. You can catch details you'd miss on a phone, ensuring everything is perfectly polished. This also helps you sidestep the weird compression issues that sometimes pop up when you transfer media to your phone.
- Scheduling Becomes Effortless: Tools like Meta Business Suite let you map out your content calendar for weeks or even months ahead of time. That kind of consistency is a cornerstone of any successful organic social media strategy.
The ability to batch-create and schedule content from a desktop is a game-changer. It helps you maintain a consistent brand presence without the daily stress of having to post manually.
At the end of the day, posting from a desktop allows you to treat Instagram with the same level of professionalism as your other marketing channels. And while we're focused on general content here, it's worth noting that this workflow is fantastic for creatives, too. For example, musicians can develop a more robust strategy for sharing music on Instagram to grow their audience.
How to Use Instagram's Native Desktop Uploader
Sometimes you just need to get a post up quickly, without all the bells and whistles of a third-party app. For that, Instagram's own website is your best bet. Back in late 2021, Instagram finally rolled out a native uploader, which was a huge relief for anyone who remembers the clunky workarounds we used before.
This method is the most direct way to get your content from your computer to your feed. No extra software, no new sign-ups.

If you've ever asked yourself, can I post to Instagram from my computer without any hassle? This is the answer. It’s perfect for those straightforward, one-off posts.
Finding and Using the Create Button
Getting started is as easy as it sounds. Just pull up Instagram.com in your favorite browser and log in. Once you're on your feed, cast your eyes over to the navigation menu on the left side of the screen. You're looking for the plus sign (+) inside a square—that's your "Create" button.
Give that a click, and a new window will pop up. From here, you can either drag your photos or videos right into the box or click the blue button to browse the files on your computer. It’s pretty intuitive.
Pro Tip: Don't think you're limited to a single photo. You can select a whole batch of images to create a carousel post or upload a video, just like you would on your phone.
Once your media is loaded, Instagram walks you through the editing steps. You can crop your image to the perfect aspect ratio, slap on a filter, or fine-tune things like brightness and contrast. It's a simplified version of the mobile editor, but it gets the job done.
Crafting and Publishing Your Post
Now for the fun part—and the best reason to post from a desktop: typing on a real keyboard. Write out your caption, add your hashtags, and tag any relevant accounts. It's so much faster than thumb-typing on a tiny screen.
You can also add a location tag, which is great for local engagement. When you’re happy with how everything looks, just hit the "Share" button, and your post is live.
So, what’s the catch? Well, there are a few limitations to keep in mind.
- What Works: Single photos, multi-image carousels, and videos for your main feed are all supported. This covers most of your everyday posting needs.
- What Doesn't: For now, you can't post Instagram Stories or Reels using the native desktop site. For those formats, you'll still need to turn to your phone or use a more powerful tool like Meta Business Suite.
For those times when you've already edited a beautiful photo on your computer and just want to publish it, this native uploader is easily the most efficient way to go.
Scheduling Posts With Meta Business Suite
When you outgrow Instagram's basic web uploader, the next logical step is Meta's own powerhouse tool: the Meta Business Suite. It's the official, free solution for managing both your Instagram and Facebook presence from one place. I use this tool daily, and it’s an absolute lifesaver for planning a content calendar, scheduling posts ahead of time, and digging into performance data.
The only real catch is you'll need to have an Instagram Business or Creator account, and it must be linked to a Facebook Page. Personal accounts just don't get access to all the good stuff. But once you're set up, you can really start managing Instagram from your desktop like a pro.
Navigating the Content Planner
The core of the Business Suite is its content planner. This gives you a bird's-eye calendar view of everything you have scheduled and already published across both platforms. It’s the perfect way to spot gaps in your content schedule and make sure you’re posting consistently.
From the planner, you can create new posts, Stories, or even Reels. The post-creation window is surprisingly powerful. You can upload your media, craft different captions for Facebook and Instagram if you want, and add all the essentials like hashtags, location tags, and user tags.
One of the biggest wins here is scheduling content for peak engagement times. The suite even suggests optimal times based on when your specific audience is most active online. While there's a lot of chatter about the best times to post, there's a surprising lack of data on whether posting from a desktop has any impact versus mobile. You can find more general advice on optimal posting times on mavic.ai to pair with Meta's recommendations.
When you start scheduling content, you’re no longer just reacting to your social media feed. You can create a week's or even a month's worth of posts in one sitting, set them to go live automatically, and free yourself up to actually engage with your community.
If you’re juggling a Facebook Page alongside your Instagram, it helps to understand the full picture. Getting a handle on your entire content pipeline is key, which is why we have a guide on how to find scheduled posts on Facebook.
Unlocking Deeper Analytics and Insights
Don't mistake the Business Suite for just a scheduler—it's a seriously powerful analytics tool, too. It provides much more detail than the basic insights you get inside the Instagram app.
You can get a clear look at:
- Reach and Impressions: See exactly how many unique accounts your posts are hitting.
- Audience Demographics: Get a breakdown of your followers by age, gender, and location.
- Content Performance: Quickly spot your top-performing posts, Stories, and Reels to see what your audience truly loves.
This data is gold. When you know which formats and topics are driving the most engagement, you can stop guessing and start making content that you know will perform well. This is a crucial part of a smart content strategy. Exploring different methods for how to schedule social media posts can help you build a consistent and effective workflow, ensuring you're not just posting, but posting with a clear purpose.
Automating Your Content With Third-Party Tools
While Meta Business Suite is a solid, free option, sometimes you just need more firepower. That’s where third-party scheduling tools come in, offering advanced features designed to put your content calendar on autopilot. Platforms like Buffer, Later, and Hootsuite are lifesavers for social media managers who need to post to Instagram from a computer with serious efficiency.
These tools are more than simple schedulers; they’re a full command center for your social media strategy. For instance, you can visually map out your grid's aesthetic weeks in advance, save batches of hashtags for different content topics, and dig into analytics that blow Instagram's native insights out of the water. They are an investment, but for any serious marketer, the time you get back is priceless.
Why Third-Party Schedulers Are Worth It
The biggest win with these platforms is automation that actually saves you time. You can bulk-upload dozens of posts at once, plug them into a predefined schedule, and then walk away, knowing your profile will stay active. This is a complete game-changer for staying consistent without the daily headache of manual posting.
Many of these tools also have unique features you won’t find on the native platforms:
- Visual Grid Planning: Tools like Later and Planoly let you literally drag and drop scheduled posts to see how your grid will look. It's perfect for nailing a cohesive, professional aesthetic.
- Hashtag Management: Create and save lists of relevant hashtags so you can add optimized groups to your posts with just a click. No more copy-pasting from a notes app.
- Best Time to Post Suggestions: These platforms analyze when your audience is most active and suggest the best times to schedule content for maximum reach and engagement.
And if you’re juggling multiple accounts or working with a team, the collaborative features are a must-have. You can set up approval workflows, assign posts to teammates, and manage all your clients or brands from one clean dashboard. For a deeper dive, we have a great resource covering the best third-party apps for Instagram.
Building an Evergreen Content Library
One of the smartest strategies you can deploy with these tools is building a library of evergreen content. Think of your timeless, high-value posts—tips, tutorials, quotes, or answers to common questions—that stay relevant no matter when someone sees them. Instead of letting that great content get buried in your feed, you can put it on a loop.
By creating a content library, you ensure that your best posts are consistently seen by new followers. This maximizes the value of the content you worked so hard to create and keeps your feed populated with helpful information even during busy periods.
Platforms like our own EvergreenFeed take this idea even further by integrating directly with schedulers like Buffer. You can sort your best evergreen posts into different categories (or "buckets"), set a unique schedule for each category, and let the tool automatically pull from your library and add posts to your Buffer queue. This creates a varied and consistent content mix without you having to lift a finger. It’s the ultimate "set it and forget it" approach to keeping your Instagram profile active and engaging.
The "Inspect Element" Trick for Quick Posts
Ever find yourself with a perfectly edited photo on your desktop, needing to get it on Instagram right now? Before Instagram added its native desktop uploader, social media managers had a clever trick up their sleeves—and it still works like a charm. By using your browser's built-in developer tools, you can essentially trick Instagram into thinking you're on a phone, revealing the mobile interface and the precious "+" upload button.
This method requires zero extra software or new accounts. It's a fantastic, in-a-pinch solution built right into browsers like Google Chrome, Safari, and Firefox. While it's more of a manual workaround now, it’s still a reliable backup if the official uploader is acting up or you just need to post a single image quickly.
How to Do It in Chrome
Getting this to work in Chrome is surprisingly easy. Once you’re logged into your account on Instagram.com, just right-click anywhere on the page and choose "Inspect" from the pop-up menu. Don't be intimidated by the wall of code that appears—you only need one button.
In the new panel’s toolbar, look for an icon that looks like a tiny phone and tablet. This is the "Toggle Device Toolbar" button. Click it, and your view of Instagram will snap into a narrow, mobile-like frame.
If you don't see the mobile navigation bar with the plus (+) icon at the bottom right away, just hit the refresh button on your browser. Voila! The mobile upload experience, right on your desktop.
Faking It in Safari
For all the Mac users out there, the process on Safari is just as simple, though it might require a one-time setup step first.
- First, head to Safari > Settings (or Preferences on older macOS versions).
- Go to the "Advanced" tab and make sure the box at the very bottom, "Show features for web developers," is checked.
Once that's enabled, go to Instagram.com. In the menu bar at the top of your screen, you'll now see a "Develop" option. Click it and select Enter Responsive Design Mode. The website will instantly reformat itself into a mobile view. Just like with Chrome, a quick page refresh should make the upload button appear.
I still use this trick all the time. It’s perfect when I've just finished editing a single photo and don't want to go through the hassle of Airdropping it to my phone just to post. It's a direct, fast lane from desktop to feed.
Keep in mind, though, this is a workaround for a reason. It has its limits. You’re essentially getting the bare-bones mobile posting experience. That means it’s great for a single image or video, but don't expect to schedule posts, create carousels with multiple images, or access any advanced business features. For anything more complex, you'll want to stick with the official uploader or a robust tool like Buffer.
Common Questions About Posting to Instagram from a Computer
Even with a few different ways to post to Instagram from your computer, some questions always seem to pop up. Sorting these out from the get-go will save you a ton of frustration and help you pick the workflow that actually makes sense for you. Let's tackle the big ones.
The most common point of confusion usually revolves around what kind of content you can actually post. Can you really upload everything from your desktop? The short answer is yes, but it completely depends on the tool you're using.
Can I Post Instagram Stories or Reels From My Computer?
You absolutely can, but not with every method. If you want to get Instagram Stories and Reels scheduled and published right from your desktop, you’ll need to lean on a more powerful platform.
- Meta Business Suite: This is Meta's own powerhouse for businesses. It lets you build and schedule both Stories and Reels directly in your browser, which is a lifesaver for anyone planning their content calendar in advance.
- Third-Party Tools: Schedulers like Buffer or Later also handle scheduling and auto-publishing for Reels. Story support can be a mixed bag; some tools offer full scheduling, while others will just send a notification to your phone to finish the post manually.
The simpler routes, like using Instagram's own website uploader or the browser developer trick, are pretty limited here. They’re only built for standard feed posts—think single images, carousels, and regular videos. For the more dynamic stuff like Stories and Reels, a dedicated scheduling tool is the way to go.
Do I Need a Business Account to Post From My PC?
This is a really important distinction. For just a quick, one-off post, you don't need a special account at all. Anyone with a personal Instagram profile can hop onto Instagram.com and use the native uploader, no problem.
But the second you want to get into scheduling, analytics, or any kind of automation, a Business or Creator account is non-negotiable.
To connect your account to powerful platforms like Meta Business Suite or pretty much any third-party scheduling app, you have to make the switch from a personal profile. The good news is that it’s free and unlocks the API access these tools need to do their magic.
Are Image and Video Specs Different for Desktop Uploads?
Nope! The rules of the road for quality are exactly the same, no matter where you upload from. Instagram’s recommended specs don’t change whether you’re posting from your phone on the go or from your computer at your desk.
To make sure everything looks crisp and professional, aim for these dimensions:
- Square Posts: 1:1 aspect ratio (1080 x 1080 pixels)
- Vertical Posts: 4:5 aspect ratio (1080 x 1350 pixels)
- Landscape Posts: 1.91:1 aspect ratio (1080 x 566 pixels)
When it comes to videos, MP4 format is always the safest bet for quality and compatibility. Sticking to these specs means your content won’t get awkwardly cropped by the platform, a simple step that makes a world of difference in how professional your feed looks.
Ready to put your best content on autopilot? EvergreenFeed integrates with Buffer to automatically schedule and re-share your high-performing posts, keeping your feed active and engaging without the manual grind. Start automating your content for free today.